Showing posts with label Lesson. Show all posts

Friday, July 31, 2015

Lesson 18


Pawn Structure

Pawn structure is often the backbone upon which the strategy in a game rests. There are several things that need to be looked at when evaluating the pawn structure of a game. These include whether the game is open or closed, open files, open diagonals, vulnerable potential outposts, pawn islands, pawn chains, doubled pawns, backward pawns, passed pawns, protected passed pawns,
overall majorities, and local majorities.

A game is considered open if the center pawns (the ones on the d and e files) have been captured. A closed game is where they have not been captured. In general, an open game means pieces are able to move more easily through the center of the board, which leads to a more active and generally tactical game. A closed game means that positional considerations are more important. The players generally have more time to build a plan and the game, while often lasting longer in general, often hinges on subtleties that are less likely to be noticed by novice players. Usually beginners are encouraged to strive for open games to improve their tactical ability and only play closed games after they develop more of a feel for the game.


An open file is one with no pawns on it. This is basically a path for rooks to move on. This is usually their most powerful position. Often play can focus on who gains control of a file because this gives the person controlling it an advantage. A half open file is one where only the opponent's pawn is on the file. This is often a good second choice for a rook because it attacks the pawn in
question and often opens up the rest of the way.

An open diagonal is again a diagonal with no pawns blocking it. This is one that a bishop can traverse. Usually an open diagonal that travels through the center of the board is preferable because it allows the bishop to move to the greatest degree.

A vulnerable potential outpost is a square in the opponent's territory that can not be defended by an opponent's pawn. This is usually the result of a pawn that has been advanced too far or a weakened pawn structure. Placing a knight on an outpost gives the knight attacking potential and makes it a relatively stronger piece. Other pieces may also be placed on outposts as well.

A pawn island is any pawn or group of connected pawns separated from any other pawns by an open or half open file. Having two or three pawn islands is usually necessary to activate your rooks, but more than that indicates a weak pawn structure. The endpoints of pawn islands are typically potential weaknesses and a large number of breaks in your pawn structure means there are more places your opponent can penetrate into your territory.

A pawn chain is a set of pawns linked so each one is protected by a pawn behind it. Pawn chains form on diagonals. Pawn chains often contribute to determining which side of the board a player will try to open play up on (pawn chains point toward the direction that typically are attacked because a bishop can be on the diagonal behind it. This allows the bishop to attack the opponents
side of the board without worrying about their pawns getting in the way and with relative safety from opposing pieces that have to get around the pawn chain to attack the bishop. A pawn chain is most effectively attacked at its base (the pawn that has no other pawns protecting it).

Doubled pawns are pawns on the same file. This happens when a pawn captures. Doubled pawns often are seen as weaknesses because the lower pawn can not advance beyond the top one and doubling pawns usually leads to openings into your own territory for the opponent to attack. However, doubled pawns do have some advantages. For instance, a doubled pawn can advance without leaving undefended outposts or backward pawns. Tripled pawns are always weaknesses.

A backward pawn is one with no adjacent pawns behind it or on the same rank. It often needs to be defended with a piece and can not prevent an opposing piece from parking in front of it and using that square as an outpost while preventing the pawn from being able to advance. 

A passed pawn is a pawn that has no opposing pawn in front of it and is past any adjacent opposing pawns. This pawn has the potential to advance to the 8th rank and queen. It can only be stopped by an opposing piece or the king. A protected passed pawn is a passed pawn guarded by another pawn. capturing the pawn still leaves you with a passed pawn on recapture. If the only opposing piece is the king, neither pawn can safely be captured because that would put the king behind the passed pawn. The passed pawn can then advance and the king will never be able to


Wednesday, July 8, 2015

Lesson 17

Strategic Elements: Exploiting the Weak f2/f7 Square (Part 03)


Overcoming Strong Opponent

In all of the examples above, the losing player ignored the weakness. Many chess players have won games this way, but only against beginners, or players trying to lose. Is it possible to exploit these weak squares when your opponent pays attention to the game and understands these ideas? Yes. It takes more work, and deeper thought.

First, mobilize all your pieces, instead of trying for a quick knockout with two or three pieces. Next, combine attacks against weak spots with threats against other targets. Such double attacks characterize chess at the highest levels of play.

Trying for a quick knockout might be fun, but it becomes a bad habit. Please notice that the winning player got away with bad moves in several of the games above. Making moves with the idea that you can gain something only if your opponent does not see the purpose, develops bad habits. Take in from a middle-aged patzer like me, bad habits learned as a child take years to repair. It is far easier to work hard at beginning with good habits. In order to discourage bad
habits among scholastic chess players, some chess teachers use a special rule. When they run tournaments among their pupils, they count a win in four moves as a loss. This practice may seem harsh, or even unfair. However, the rule helps children learn strategies that are useful against strong players.

In the next game, there is no quick mate. Instead, black attempts to hinder white’s development with pressure on f2. White develops anyway, but at the cost of a pawn. Later, white’s pressure on f7 saves a lost game with a combination that forces a draw. I had the white pieces against Keith, a player rated nearly 300 points higher than me. After the game, he told me this was the first time he had played against a King’s Gambit and not won the game.

1. e4 e5 2. f4. This move marks the King’s Gambit, a risky opening similar to Bird’s. 2…Bc5. Black pressures the f2 square. The main benefit of this move is to delay white's efforts to move his king to safety by castling. 3. Nf3 d6 4. Bc4. White's idea in the King's Gambit is to put pressure on f7 from the beginning. 4...Nf6 5. Nc3 0–0 6. d4? This move is premature. White ends up a pawn down because of the resulting sequence. 6...exd4 7. Nxd4 Nxe4 8. Nxe4 Re8 9. 0–0 Rxe4 10. c3 Nc6 11. Bd5 Bxd4+ 12. Kh1 (Not 12.cxd4? Rxd4 and white loses another pawn). 12...Re8 13. cxd4 Qf6 14. Bd2 (14. Bxc6 may have been better). 14...Qxd4 15. Qb3 Be6 16. Bxe6 fxe6 17. Bc3 Qb6 18. Qd1. White wants to keep the queens on the board when down two pawns. 18...Qc5 19. Rc1 Qf5 20.Qb3 Rab8 21. Rce1 Qf7 22. Rf3 d5 23. Qd1 Ne7 24.Qc2 Qf5 25. Qe2 Nc6. Notice how the empty f7 square leads to vulnerability for the black king. 

White threatened to win back a pawn with check, and then double rooks on the opened file. 26. Qf2 Rbd8 27. Be5 Qf7 28. b3 d4 29. Rd1 Nxe5 30. fxe5 Qd7. We reach the critical position. Here I realized that I could not stop the advance of the passed pawn on the d-file. Then I saw the saving combination. 31. Rf1! d3 (31...Qe7!?) 32. Rf7 Qd4 33. Rxg7+ Kxg7. Black must take the rook (33...Kh8 34.Qf6 Rf8 35.Rf7+ Kg8 36.Qg7#). 34.Qf6+ draw agreed. The game could have continued 34. ... Kg8 35. Qf7+ Kh8 36. Qf6+ Kg8 37. Qf7+ Kh8 38. Qf6 and a draw by repetition.

Study the Masters

You can improve your chess game by studying games by strong players. Do your own analysis of the following games. Pay particular attention to attacks on f2 and f7. Notice how these attacks combine with other threats. Notice also how well players respond to the attack.
1. This game was played a couple of years ago between two of the strongest players in the world. The numbers in parentheses are each player’s rating at the time the game was played.

Sergei Tiviakov (2655) – Loek Van Wely (2585)

1. e4 c5 2. Nf3 d6 3. d4 cxd4 4. Nxd4 Nf6 5. Nc3 a6 6. Be2 e6 7. a4 Nc6 8. 0–0 Be7 9. Be3 0–0 10. f4 Qc7 11. Kh1 Re8 12. Bf3 Bd7 13. Nb3 b6 14. Bc8 15. g5 Nd7 16. Bg2 Bb7 17. Qh5 g6 18. Qh3 Nb4 19. f5 Nxc2 20. fxg6 fxg6 21. Rf7 Nf8 22. Raf1 Qc4 23. Bd2 e5 24. Nd5 Bxd5 25. exd5 h5 26. gxh6 Kh8 27. Rg7 Nh7 28. Qe6 Black resigned.

2. The second master game comes from a match played in 1834 in London. This match (a series of games between the same players) resulted in several memorable games. It was one of the longest chess matches in history, at least 85 games. The winner in this game won 27 and lost 45, with 13 draws.

Alexander McDonnell — Louis Charles de la Bourdonnais

1. e4 e5 2. f4 exf4 3. Nf3 g5 4. Bc4 g4 5. Nc3 gxf3 6.0–0 c6 7. Qxf3 Qf6 8. e5 Qxe5 9. Bxf7+ Kxf7 10. d4 Qxd4+ 11. Be3 Qg7 12. Bxf4 Nf6 13. Ne4 Be7 14. Bg5 Rg8 15. Qh5+ Qg6 16. Nd6+ Ke6 17. Rae1+ Kxd6 18.Bf4#

3. The last game comes from a simultaneous exhibition.One player, Susan Polgar here, plays a large number of opponents in separate games, all at the same time. Susan Polgar is the former Women’s World Chess Champion. Her younger sister, Judit, is the only woman ever rated above 2600.

Susan Polgar — Shoengold

1. Nf3 d5 2. d4 Nf6 3. c4 dxc4 4. e3 g6 5. Bxc4 e6 6. 0–0 Be7 7. Nc3 0–0 8. e4 c6 9. Bh6 Re8 10. Ne5 Nbd7 11. Nxf7 Kxf7 12. Bxe6+ Kxe6 13. Qb3+ Kd6 14. Bf4+ Ne5 15. dxe5+ Kc7 16.exf6+ Bd6 17. Qf7+ Bd7 18. Bxd6+ Kc8 19. Rfd1 b6 20. Be7 Qc7 21. Rxd7 with a decisive advantage for white.

The End.

Friday, July 3, 2015

Lesson 16

Strategic Elements: Exploiting the Weak f2/f7 Square (Part 02)


Exploiting the Weakness

Beginning chess players soon learn how to deliver checkmate against an unprepared opponent. For example, consider the following game that gets played, it seems, in nearly every children’s tournament. 
1. e4 e5 2. Bc4 Nc6 3. Qh5 d6 4. Qxf7#


Diagram 01

Notice how this checkmate exploits the weakness of the f7 square. This pattern is called Scholar’s Mate. It is exciting to win a game this way, but it will not work against a prepared opponent. It is too easily prevented.

Consider another game where white tries for this quick knockout. 1. e4 e5 2. Bc4 (aiming for the weak square at f7) Nc6 3. Qa5 g6 (prevents mate, and prepares the g7 square for the bishop) 4. Qf3 (white continues the attack on f7) Nf6 (see diagram 2). Now black prevents mate, and has the beginnings of a strong defensive structure.

Black could stop white cold, however, as early as the second move. 1. e4 e5 2. Bc4 Nf6. Here black follows the advice of experts, “develop knights before bishops.”

Diagram 02

The short game called Fool’s Mate offers a memorable way of understanding the weakness of the f2 and f7 squares. This mate requires a lot of help from your
opponent, who must blunder. 1. f4?! This is a poor first move for beginners, but some experts play it. I also play it occasionally, although I am not an expert. It is named Bird’s Opening after Henry Edward Bird He played it in a match against John Wisker in 1873. Bird liked it because it can lead to interesting games. It is risky, however, because it exposes the king through f2. Avoid it before you develop strong strategic knowledge and tactical skills. Black replies 1. … d5. This move stakes a claim to the center, and increases the mobility of the queen, bishop, and knight. 2. g4?? This move is the greatest blunder in chess, and t is not the move Bird played. White should play Nf3, the second move in Bird’s Opening. Qh4#. Fool’s Mate takes two moves!

Now look at another game that exploits the weakness of the f7 square. I played this game at the Internet Chess Club (ICC), a good playing site for serious chess players. I’ve played this exact game three times at ICC against different opponents. 
White: Wulebgr (my chess handle), black: Miles. 
1. e4 e5 2. Nf3 Nc6 3. Bc4 d6 4. Nc3 Bg4 5. Nxe5? Bxd1?? 6. Bxf7+ Ke7 7. Nd5# (see diagram 3). 
In this game white’s fifth move was a gamble that could have lost the game, and has several times. Instead of greedily grabbing the bait, black should play 5. … Nxe5 when white’s attack is over and black is up a piece.

Diagram 03

The mating position in diagram 3 has been given the name Legall’s Mate because of a game played about 1750 by Kermur de Legall against a player whose name is not recorded. That game went 1. e4 e5 2.Nf3 d6 3. Bc4 Bg4?! “Knights before bishops” 4. Nc3 g6? 5. Nxe5! (see diagram 4) Bxd1?? 6. Bxf7+ Ke7 7.Nd5#. Notice in the diagram that if black does not take the bait (queen), white still wins a pawn (5. … dxe5! 6.Qxg4). White would give up a knight for a bishop and pawn with three pieces developed black’s none. Legal did not take the risks that I took to reach a similar final position. Black should have played 3. … Nf6 before bringing out the bishop because the knight could protect the g4 square. In addition, a knight cannot deliver checkmate from d5 when there is a defending knight on f6.

Diagram 04

Lesson 15


Strategic Elements: Exploiting the Weak f2/f7 Square (Part 01)


Weak Pawns and Squares

Set up the board and pieces. Before you move a piece, look carefully at the initial set-up.Notice how the pawns are protected by the pieces behind them, but some pawns have more protection than others. Look at the pawn on a2. What protects it? Now look at the pawn on d7. Is it better protected than the pawn on a2? If two black pieces attack the pawn on a2, black can win the pawn because it is only defended by the rook on a1. But if white wants to attack the pawn on d7, he must bring a large army because the pawn is defended by a knight, bishop, queen, and king. Notice that the pawns on d2, e2, d7, and e7 are each heavily defended by four pieces.

Which pawns are the weakest in the starting position? Several pawns are protected by only one piece, but there is a difference in the value of the pieces protecting these pawns. 

If black attacks the pawn on a2 with a knight and bishop, she will win the pawn. If her opponent recaptures, she will also win a rook for a minor piece. Now, what happens if two pieces attack the pawn on f7? If one piece captures the pawn, the other piece defends it. The king cannot capture a defended piece, because he is not allowed to move into check. Only kings defend the pawns on f2 and f7. These are the weakest pawns in the starting position. If one of these pawns advances, its starting square remains weak until other pieces are brought in for defense.

Thursday, May 28, 2015

Lesson 14

Strategic Elements: Structure

During our lesson on space, we saw how a line of pawns can function as a wall along the border of one's territory.  The wall analogy is apt in another sense as well; viz., that walls are typically more useful when they are structurally sound.  Examine the following diagram:


Without thinking too hard about it, which side would you say has the better pawn structure?  If you said White, you're correct!  White's wall of pawns has a solid, orderly look to it, whereas Black's has all sorts of holes and other structural defects.

Poor pawn structure can be disadvantageous for a whole variety of reasons:

1) A defective pawn wall makes for a poor defensive barrier.  Look at the diagram above and imagine that both sides have castled Kingside.  White's King would have a solid wall of pawns in front of him to protect him from attack, whereas Black's King would be exposed and subject to harassment down the open g-file.  In fact, any of Black's pieces on the back rank would be vulnerable to attack through the numerous holes in the pawn structure.  Without a solid defensive wall of pawns, Black might very well lose material or suffer checkmate.

2) A defective pawn wall also makes for an ineffective territorial border.  It can be breached easily by your opponent, who might take your territory away from you.  In the diagram above, Black's Queenside territory is looking a little "loose" and ripe for an invasion by White.  Without a strong border, Black might lose control of some territory and suffer a space disadvantage as a result.

3) Poor pawn structure usually equals weak squares.  In the diagram above, Black has weak squares at a5, d4, f5, and h6.  They are weak because they cannot be protected by pawns -- White could place pieces on those squares without fear of being chased away by any of Black's pawns.  From those squares, White's pieces could exert a powerful influence over Black's position, possibly even serving as the advance guard for an attack.

4) Some of the pawns themselves are vulnerable since they can't be protected by other pawns.  This is the case with Black's pawns on a6, d5, f6, f7, and h7.  Either those pawns will fall prey to White's pieces, or Black's pieces will be reduced to the passive role of protecting the weak pawns.

Pawn structure weaknesses usually come about from exchanges.  Consider the following series of moves 

1. d4 Nf6 
2. Bg5 h6 
3. Bxf6 gxf6.  

By exchanging the Bishop for the Knight, White has disrupted Black's pawn structure.  Now Black will have to think twice before castling Kingside.  If Black had played 2...e6 instead, then after 3. Bxf6 Qxf6 Black's pawn structure remains in good shape.  The lesson to be learned from this is that during piece exchanges, try to keep your pawn structure intact, unless there's some other good reason not to.

Wednesday, May 27, 2015

Lesson 13

Strategic Elements: Time (Part Two)

The Initiative

If one side has control over the course of the game then that side is said to "have the initiative."  The side with the initiative usually has greater freedom, flexibility, and activity than the side without the initiative.  This is because the side with the initiative usually has the power to force the opposing side to react passively instead of pursuing more active plans themselves.

Let's return to that pedagogical classic one more time: that's right, the Morphy game you've come to know and love throughout this tutorial series.  By constantly creating threats against his opponent, Morphy dictated the course of the entire game.  Let's take a quick look at a few key moments at which Morphy (playing White, as you'll recall) makes great use of the initiative.  

1.e4 e5 
2.Nf3 d6


This last move establishes Philidor's Defense.  It's solid, but not very active.  It's as though Black doesn't even want to try to gain the initiative!

3.d4 Bg4 
4.dxe5 Bxf3 
5.Qxf3 dxe5 
6.Bc4!


Morphy threatens Black's King by attacking the weak f7 square with his Queen and Bishop.

6...Nf6
Black counters the threat, but . 

7.Qb3!
Morphy renews the threat by shifting his Queen to the same diagonal as his Bishop (this is sometimes called a Queen and Bishop Battery). 

7...Qe7
Black protects the f7 square in the only reasonable way, but he's now behind in development and has developed his Queen to an awkward square.  The initiative is paying off for Morphy already!

8.Nc3
Notice that Morphy might have thought about snatching a pawn with 8. Qxb7, but he's more interested in maintaining the initiative.

8...c6 
9.Bg5


Morphy keeps up the pressure by pinning Black's f6 Knight.

9...b5
This move looks very active.  After all, it attacks White's Bishop.  Black probably thinks that this gives him the initiative, since it appears to force Morphy to react to the threat of loss of material (10...bxc4).  Looks can be deceiving though, and Black is in for a nasty surprise.

10.Nxb5!
Morphy sacrifices material in order to keep the initiative.

10...cxb5 
11.Bxb5+


Checks are the most forcing of all moves, and a common way of securing or maintaining the initiative.

11...Nbd7
Black is once again forced to react passively to Morphy's threats.  The initiative is still very much in Morphy's hands.

12.0-0-0
The Rook on d1 puts additional pressure on the Black King.

12...Rd8 
And yet again, Black must react rather than act.

13.Rxd7
Morphy sacrifices a Rook in return for a Knight (a net loss of 2 points of material, as you'll no doubt recall) in order to maintain the initiative and keep the attack going against the Black King.

13...Rxd7 
14.Rd1 Qe6


Black's Queen steps aside in order to break the pin created against the f6 Knight by the Bishop on g5.  But it's too little too late, and Morphy finishes with a beautiful sacrificial combination.

15.Bxd7+ Nxd7 
16.Qb8+!! Nxb8 
17.Rd8#


The initiative is often secured by means of tactics, attacks against the enemy King, or threats to win other strategic advantages such as material, space, or structure.  Sometimes one side will sacrifice material, space, and / or structure in return for the initiative, hoping it will pay off later.  

Sometimes one side will deliberately pass over an opportunity to secure an advantage in material, space, and / or structure in order to avoid handing the initiative over to the enemy.  The initiative can dissipate quickly or last throughout an entire game.  The initiative can pass back and forth between the two sides or remain in the hands of one player exclusively.  Thus, the initiative is subtle and amorphous, much like Time itself. It has been known to perplex even advanced players.  As such, it shouldn't be a big concern for most beginners.  For now, just be aware of it, and always do your best to play actively if you can do so without unacceptable risk or consequences.

Lesson 12

Strategic Elements: Time

Lead in Development

We discussed development (as well as general opening principles which contribute to development) in our lessons on Basic Opening Strategy.  Consider the following series of moves 

1.e4 a5
White plays a good opening move which contributes to the development of the pieces and control of the center.  Black on the other hand makes a pawn move which does neither.

2.d4
Since 1...a5 does nothing to prevent it, White plays 2.d4 and establishes a strong pawn center.

2...a4
Black wants to move the Rook, but 2...Ra6 loses material after 3.Bxa6 bxa6.

3.Nf3
White continues developing.

3...Ra5
Apparently, Black is one of those beginners who likes to move big pieces like the Rooks. Though it may look fun, it doesn't help Black achieve the opening objectives we discussed in our previous lessons.

4.Bd2
White develops a piece while attacking Black's Rook

4...Ra7
Now Black has to waste a move retreating the Rook to safety. Black thought about playing 4...Rh5, but this loses material after 5.g4 Rh6 6.Bxh6 Nxh6 7.g5 Ng8 ( 7...Ng4 8.h3 Nxf2 9.Kxf2 ).

5.Bd3 e6 6.0-0 Qf6
White calmly develops another minor piece and castles the King to safety. 

7.Nc3 Qd8
Black has to retreat the Queen to a safe square. If instead 7...h5 then 8.Bg5 Qg6 9.e5 loses the Queen.

It's safe to say that White has a tremendous lead in development. It's almost as though White has been allowed to move more often than Black; thus it makes sense to think of a lead in development as an advantage in "time."

A lead in development is usually an advantage because it means that you'll be able to initiate your middlegame plans sooner than your opponent. By move eight in the example above, White has developed the entire White army, and is now ready to think about ways to secure other middlegame advantages. This might involve an attempt to win material, gain space, create weaknesses in Black's pawn structure (which we'll discuss in a later lesson), or even launch an attack against the enemy King. Black, on the other hand, still has a lot of developing to do before even thinking about anything else.

Wednesday, April 22, 2015

Lesson 11


Strategic Elements: Space


"Space" refers to how much territory you control. This is usually determined by the placement of your pawns. Examine the following board:


Each sides' pawns form a kind of territorial border. Each pawn wall encloses the field of the squares behind it, preventing invasion by enemy pieces and providing a safe haven for allied pieces.

All things being equal, it's an advantage to control more space than your opponent. This is because more space usually means greater freedom of movement for your pieces. Conversely, less space usually means cramped, immobile, and awkwardly placed pieces. Therefore, it's important that you stake a claim for your fair share of space from the very beginning of the game. In fact, we've already discussed this!

Think back to our Basic Opening Strategy lesson on control of the center. In the opening, the center is the most important area of space on the board. As we saw, control over that central space was accomplished by advancing central pawns and supporting them with pieces (like the Knights and Bishops).

You can do the same thing on the Kingside and Queenside too. Advanced pawns, supported and protected by pieces, can create a territorial wall in any sector of the board. If your pawn wall is further advanced than your opponent's, then you probably have a space advantage. Be warned, though: pawn advances are a double-edged sword. Sometimes the pawns themselves can become targets for your enemy's pieces, especially if they are not properly supported by your pieces. Moreover, pawn advances can sometimes leave weak squares in their wake, so make sure that you can keep the territory behind your pawn wall secure before you consider a pawn advance.

If you find that your opponent is about to secure an advantage in one area of the board, don't panic! There are a couple of ways to deal with this. First of all, you should consider challenging your opponent's control over that area with pawn advances of your own, or by attacking and / or exchanging your enemy's pawns. Second, you might consider securing your own territory in an entirely different area of the board, in order to create a balance of respective spatial advantages.

Even if one side manages to secure an overall spatial advantage, that doesn't mean it will necessarily last. As pieces are exchanged during the course of the game, an advantage of space can become less of an advantage. This is because the fewer pieces on the board, the less cramped the side with less space will be. So as a general rule, the side with the space advantage should avoid piece exchanges, and the side with the space disadvantage should seek piece exchanges

Lesson 10


Strategic Elements: Material


“Material” refers to the pieces on the board. Some pieces are more powerful and useful than others, and are therefore considered to be more valuable. If you’ll recall from our lessons on tactics, the pieces are assigned numbers to reflect their relative value: pawns are worth 1 point, Knights 3, Bishops 3, Rooks 5, and Queens 9. (The King isn’t usually assigned a number – the game ends if the King is “captured” (that is, checkmated), so his value is infinite.) 

One has a material advantage if the sum total of one’s pieces is greater than the sum total of one’s opponent's pieces. To put it another way, if you have more and / or more valuable pieces than your opponent, you’re “ahead,” materially speaking.  For example, if you capture your opponent’s Rook and only lose a Knight in the process, then you have a material advantage of 2 points. If you exchange a Bishop for a Knight, then material is still even. If you lose your Queen in return for only a Rook, then you’re behind by 4 points.


A material advantage can be useful in lots of different circumstances. For example, if you have more material than your opponent, you may be able to make more threats than they can deal with at once. This might include threatening to capture your opponent’s pieces, or even an attack against your opponent’s King (as a matter of fact, if you have more pieces available for attack than your opponent has for defense, your attack has a good chance of succeeding).


A material advantage is also very useful in the endgame. Remember those "Basic Mates" we learned way back in our tutorial on Basic Endgame Strategy? They all involved a material advantage for the winner (King & Rook v. King, King & Queen v. King, etc.). Also, having more and / or better pieces can make it easier to promote a pawn, since you’ll have more pieces available to shepherd the pawn through to the promotion square than your opponent will have pieces to stop it. Then once you promote the pawn (often to a Queen), you’ll have an even greater material advantage.

So how do you get a material advantage? Here are a few ways:

1) Capture your opponent’s unprotected pieces. Beginners often “hang” their pieces; that is, they move them to a square where they aren’t defended and can be captured for free. (The fancy term for this is “leaving your pieces en prise.”) They usually do this by mistake, of course – they simply overlook the fact that their piece can be captured. Each time your opponent moves, take a moment to look and see if you can capture it without any repercussions. If so, grab it! Just make sure it’s really a “hanged” piece and not a sacrifice with a dash of poison!

2) Protect your own pieces so they don’t get captured. This is just the inverse of the point above. Make sure your pieces are always adequately defended, and make sure you don’t “hang” them!

3) Make favorable exchanges. If you can force an exchange of pieces that nets you material, then (all things being equal) go for it! For example, if you can trade your Bishop for your opponent’s Rook, then you’ve just won two points worth of material, and assuming your opponent can’t do something worse to you in return (like checkmate your King), you’ll have an advantage.

4) Avoid unfavorable exchanges. This is just the inverse of the point above. Don’t let your opponent trade less valuable pieces for your valuable ones unless you can do something worse in return (like checkmate the enemy King).

5) Look for tactical opportunities. We discussed tactics a while back, and (if you’ll recall) they often lead to a material advantage. Before each move, look and see if there are any tactical opportunities. Learning to recognize them is a matter of tactical training, but that’s for later. As a beginner, just review the section on Basic Tactics once in a while, and try to notice when those sorts of tactical opportunities arise.

Lesson 09

Special Moves


03. Castling


Each player may "castle" only once during a game and when conditions are met. Castling is a special move that lets a player move two pieces at once the King and one Rook. 
In castling, the player moves his King two squares to its left or right toward one of his Rooks. At the same time, the Rook involved goes to the square beside the King and toward the center of the board (see illustrations at below).

In order to castle, neither the King nor the Rook involved may have moved before. Also, the King may not castle out of check, into check, or through check. Further, there may not be pieces of either color between the King and the Rook involved in castling.
Castling is often a very important move because it allows you to place your King in a safe location and also allows the Rook to become more active.
When the move is legal, each player has the choice of castling Kingside or Queenside or not at all, no matter what the other player chooses to do. 

Before Castling

After Castling


Lesson 08

Special Moves

01. Pawn Promotion


If a pawn advances all the way to the opposite end of the board, it is immediately "promoted" to another piece, usually a Queen, before the move is ended and the clock is hit. It may not remain a pawn or become a King. Therefore, it is possible for each player to have more than one Queen or more than two Rooks, Bishops, or Knights on the board at the same time.

The Pawn is very limited in its abilities, so it has a point value of 1. However, a pawn may promote to a value of 9, or when lost create a hole allowing the opponent to do so.

Before Pawn Promotion
After Pawn Promotion

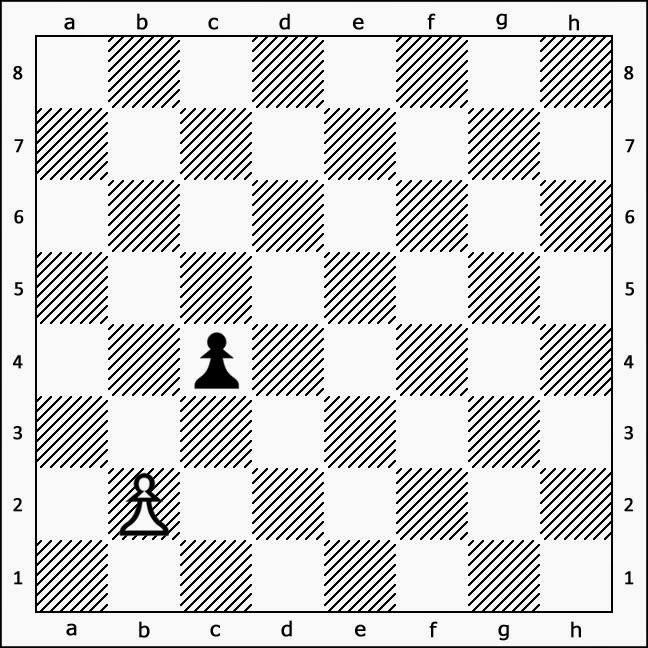
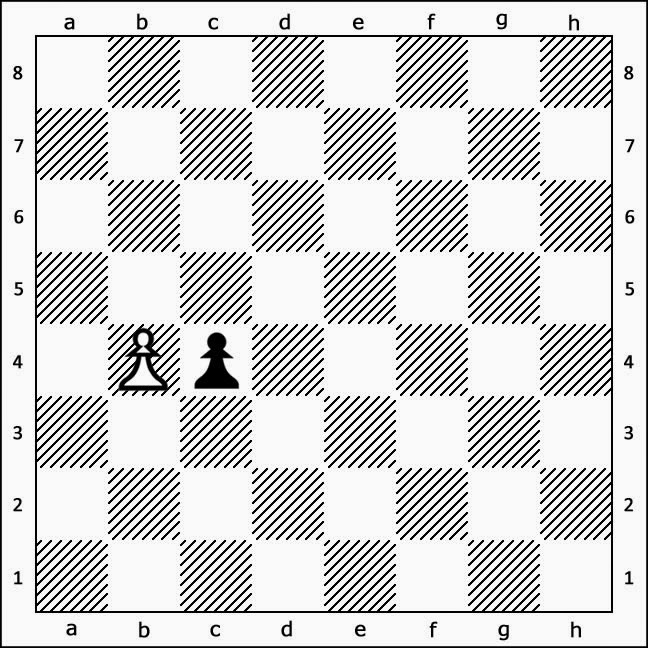
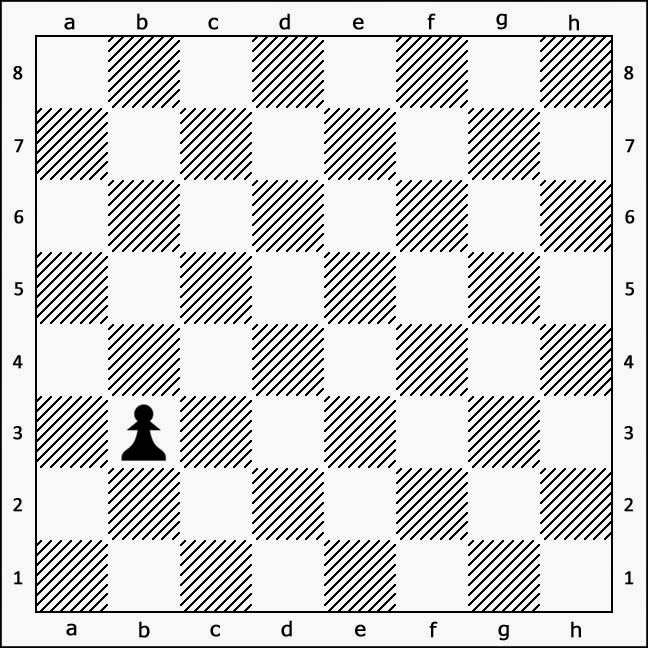
02. En passant


This French phrase is used for a special pawn capture. It means "in passing," and it occurs when one player moves a pawn two squares forward to try to avoid capture by the opponent's pawn. The capture is made exactly as if the player had moved the pawn only one square forward.

If the White player does not exercise this option immediately (before playing some other move) the Black pawn is safe from "en passant" capture for the rest of the game. But new opportunities may arise for each pawn in similar circumstances.

Before En passant Capture
White Pawn moves b4

After En passant Capture


Tuesday, April 21, 2015

The Value of Chess Pieces

The Inequality of Chess Pieces


         Pieces                  Points             Short name


KING                   No marks         K


QUEEN                09                    Q


ROOK                  05                    R


BISHOP               03                    B


KNIGHT               03                    N


PAWN                  01                    No letter


Some chess pieces are strong than others. In any case, you should treasure and respect all of them.
The King cannot be captured so one cannot put points to it. The pawn is the least valuble piece but it can be promoted to a more valuble piece.

f7 / f2 square weakness - Short Games

Fool's Mate (Two-move mate)

       
       White       Black
  1. f3             e5
  2. g4            Qh4 #


Fool's Mate 

(Three-move mate)


       White       Black
  1. e4            f6
  2. d4            g5
  3. Qh5  #


Scholar's Mate

(Four-move mate)

          
       White         Black
  1. e4              e5
  2. Bc4            Bc5             
  3. Qf3            Nc6
  4. Qxf7   #